);
Select Page

Give Blood: Find a Blood Drive Near You

Donate Blood

In the month of January we bring awareness to the importance of donating blood. Blood is an essential life source. For many who suffer traumatic accidents, chronic illnesses, medical treatments and difficult surgeries blood is a key factor to survival. The need for blood is ongoing and your contribution could be life saving. 

You could save up to three lives with your blood donation that takes only a quick visit to a blood bank.

It feels good to help others.

The RedCross provides a blood donation locator that will allow you to find a place near you. Give the gift of life. Donate blood today.

Find a Blood Drive Near you
https://www.redcrossblood.org/give.html/find-drive?adobe_mc=MCMID%3D73736120809612342672330037608664504282%7CMCORGID%3D723A22C757518E2C7F000101%2540AdobeOrg%7CTS%3D1672935274


Admins

Post and Group owners have the ability to assign other users as admins to their posts. 

Admins are displayed and labeled throughout the app, allowing collaboration in event coordination, promotion, and participation management. 

ADMIN Label

When a post owner adds Admins to a post, they will be able to edit post details. Admins are highlighted with an ADMIN label.

Volunteer and participation lists display admins.

The ADMIN label is also visible in your list of drafts and published posts.

The “About” section of a group showcases the group admins and displays the ADMIN label in your profile’s group list.

Privilages for Admins

Group Admin

Group admins are able to edit the group’s information and manage members.

Post Admin

Post admins are able to edit the event information and manage participants.

Participation Report

Receive a .CSV format file via email with details of participants and volunteers who signed up to your event.

Save and Manage Drafts

 Create a Draft Post

  1. Tap Create (+)
  2. Select the post type and tap Next
  3. Select one or more Categories for your post or tap Skip for now
  4. Give it a title – the minimum requirement to save a post as a draft
  5. Scroll down and tap Save as Draft

Feel free to edit the draft multiple times until your message is effectively conveyed. Collaborate with others by granting Admins access to your post, allowing them to edit specific post details.

Learn more about Admins and their privileges here.

Accessing Drafts

  1. Tap the yellow banner under the search bar to view all saved drafts

If the yellow banner is not present:

  1. Tap your profile picture in the top left
  2. Tap the profile picture again to open your profile
  3. Tap the drafts tab

Edit a Draft

  1. Select a draft post to edit
  2. At the top right, tap
  3. Tap Edit Event Details
  4. Edit your post, then tap Publish or Save as Draft

Feel free to edit the draft multiple times until your message is effectively conveyed. Collaborate with others by granting Admins access to your post, allowing them to edit specific post details.

Learn more about Admins and their privileges here.

Add Admins to Draft

Collaborate with others by granting Admins access to your post, allowing them to edit specific post details.

Learn more about Admins and their privileges here.

  1. Select a draft post
  2. At the top right, tap
  3. Tap Edit Event Details
  4. Scroll down to the Admins section
  5. Tap Add Admins
  6. In the Collaboration screen, find and select up to 5 admins
  7. Tap Add
  8. Save as Draft or Publish post

Feel free to edit the draft multiple times until your message is effectively conveyed.

Asociación a Grupos

Asociarte a Grupo y Ver Compromisos

  1. Abre el menú
  2. Accede a Grupos
  3. Dar en Buscar
  4. Revisa la lista o usa el Buscador para encontrar un grupo particular
  5. Selecciona el grupo
  6. Dar en botón Admisión
  7. Obtendrás inmediato acceso a detalles, compromisos, lista de miembros asociados al grupo, etc.

Admisión a grupos privados requieren aprobación por parte de administradores. Al Dar en botón Admisión estaras en Espera de aprobación. Recibiras notificación al ser admitido.


Desconectar de un Grupo

  1. Abre el menú
  2. Accede a Grupos
  3. Selecciona Grupo
  4. Dar en botón Descoectar

Crear Publicaciones

Necesidades y Anuncios Comunitarios

  1. Crear (+)
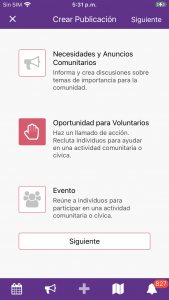
  2. Seleccionar tipo de publicación: Necesidad/Anuncio Comunitario
  3. Selecciona Categoría(s)
  4. Configuració de privacidad: Público es automaticamente aplicado, selecciona Privado y define cual de tus grupos debe ser incluido
  5. Incluir un Título
  6. Incluir Detalles
  7. Incluir hashtags
  8. Actividad Remota (sin ubicación)
  9. Ubicación – entrar el local o dirección
  10. Imágenes o vídeos
  11. Dale al botón Publicar

Oportunidades de Voluntarios

    1. Crear (+)
    2. Seleccionar tipo de publicación: Oportunidad para Voluntarios
    3. Selecciona Categoría(s)
    4. Configuració de privacidad: Público es automaticamente aplicado, selecciona Privado y indica que grupos a inlcuir
    5. Incluir un Título
    6. Incluir Detalles
    7. Incluir hashtags
    8. Indicar cuantos voluntarios necesitas
    9. Incluir Información adicional para voluntarios (detalles del trabajo, conocimientos requeridos, algún equipo que deban tener, etc.)
    10. Si el evento provee Horas de servicios disponibles – desliza a derecha
    11. Selecciona la Fecha de inicio
    12. Selecciona la Fecha de finalización
    13. Selecciona la Hora de inicio
    14. Selecciona la Hora de finalización
    15. Actividad Remota (sin ubicación) si la actividad es virtual
    16. Ubicación – entrar el local o dirección
    17. Puedes Editar Categorías
    18. Puedes Editar o compartir con grupos (Si el evento es privado puedes editarlos grupos elegidos. Si el evento es público puedes elegir grupos con los que compartir el evento)
    19. Seleccionar Imágenes o Vídeos (se require al menos una).
    20. Dar al botón Publicar

    Eventos

      1. Crear (+)
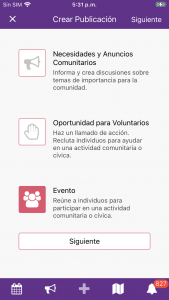
      2. Seleccionar tipo de publicación: Evento
      3. Selecciona Categoría(s)
      4. Configuració de privacidad: Público es automaticamente aplicado, selecciona Privado y indica que grupos a inlcuir
      5. Incluir un Título
      6. Incluir Detalles
      7. Incluir hashtags
      8. Selecciona la Fecha de inicio
      9. Selecciona la Fecha de finalización
      10. Selecciona la Hora de inicio
      11. Selecciona la Hora de finalización
      12. Actividad Remota (sin ubicación) si la actividad es virtual
      13. Ubicación – entrar el local o dirección
      14. Puedes Editar Categorías
      15. Puedes Editar o compartir con grupos (Si el evento es privado puedes editarlos grupos elegidos. Si el evento es público puedes elegir grupos con los que compartir el evento)
      16. Seleccionar Imágenes o Vídeos (se require al menos una).
      17. Dar al botón Publicar